How to Use
Basic Self-Therapy:
This is an easy technique you should use three to five times a day as maintenance. Or whenever you feel you need extra support. For a more comprehensive self-therapy, see the Chakra Self-Therapy below.
Pay attention to how you feel before, during, and after using the spray.
1. Hold the bottle above the top of your head, with the sprayer pointing up, and spray once.
2. Continue to hold the bottle overhead, but move it in a circle while spraying another three to five times.
3. Relax with your arms by your side, and stay still for about ten seconds while the mist rains down around your body.
Chakra Self-Therapy:
Use once daily or more often as needed when you feel you need extra support. Always do the technique in its entirety. Treat all chakras, not just a few.
Begin by familiarizing yourself with the approximate locations of the seven body chakras. Always treat the chakras in order, starting at the crown chakra and working down to the brow chakra, then the throat, heart, stomach, sacral, and finally root chakra.
1. Hold the bottle of aura spray at arm’s length away from the crown chakra, with the sprayer pointing toward it. Spray once or twice.
2. Hold the bottle at the brow chakra with the sprayer pointing forward. Spray 2 or 3 times to send the mist out and away from the chakra.
3. Repeat Step 2 with each of the other chakras in order: throat, heart, stomach, sacral, and root.
*Always close your eyes when spraying around the face or head.
*Keep out of reach of children.
Contents
Physical Ingredients:
Purified water, gemstone-infused organic grape alcohol.
Imprinted with the Healing Energies of these Gemstones:
Amethyst, Aquamarine, Blue Flash Moonstone, Blue Sapphire, Carnelian, Emerald, Indigo, Pink Chalcedony, Ruby, Tanzanite, White Flash Moonstone, Yellow Calcite, Yellow Sapphire, and 7-color-ray Diamond.
Gemandala
The Gemstone Mandala used to Make Restore Yourself Aura Spray:
This Gemandala Consists of:
Amethyst
Aquamarine
Blue Flash Moonstone
Blue Sapphire
Carnelian
Emerald
Indigo
Pink Chalcedony
Ruby
Tanzanite
White Flash Moonstone
Yellow Calcite
Yellow Sapphire
7-color-ray Diamond
A Study of the Restore Yourself Gemstones:
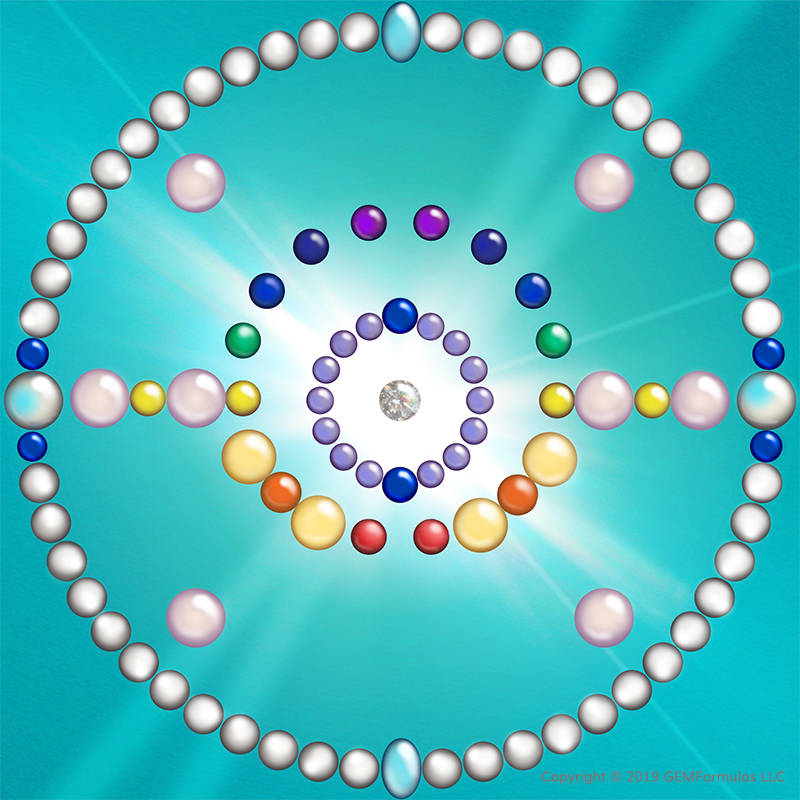
The Restore Yourself mandala reveals three distinct circles of gemstones that surround the central one-carat therapeutic 7-color-ray Diamond. The innermost circle consists of Tanzanite and Blue Sapphire. The middle circle consists primarily of the seven color-ray gemstones. The outer circle is mostly White Flash Moonstone.
Each circle serves a key function. The inner circle supports alignment, the middle circle nourishes, and the outer circle protects.
The space between the circles harbors four Pink Chalcedony. This gemstone helps you relax emotionally, so you can best receive the benefits the mandala provides.
Inner Circle: Regulates the Flow of Essential Energy to Restore Vitality
The center circle consists of Tanzanite and Blue Sapphire. Together, these gems guide an influx of Heaven and Earth energies into your life to help you feel more vital, energetic, and capable of handling whatever comes your way.
In a state of burnout, the mind disconnects from its blueprint and closes in on itself. The gemstones in this inner circle bring the mind back into alignment by first reconnecting it with the central chakra channel and its blueprint. These are represented by the Tanzanite circle and center Diamond, respectively.
Seven Tanzanite on each side of the circle represent the seven body chakras. Tanzanite vitalizes the entire chakra system and supports chakra alignment. In this mandala, with two half circles of Tanzanite capped north and south with Blue Sapphire, the emphasis is on the central chakra channel. This is an important part of the chakra system. It serves as the conduit for the Heaven and Earth energies to provide you with essential vitalizing life force. Blue Sapphire ensures that Heaven and Earth energies are flowing smoothly through all layers of your aura.
This is important because mental exhaustion can occur when the mental layer of the aura disconnects from the central channel. Emotional exhaustion can occur when the emotional layer of the aura disconnects, and so forth. This mandala’s gemstones align all layers of your aura with your core dynamo—the central chakra channel—and ultimately with the living blueprint as represented by the central 7-color-ray Diamond.
When your aura is properly connected with this channel, it’s easier to accept information about your past, present, and purpose.
Central Circle: Provides Rich Color-Ray Nourishment to Restore Depletion
In this mandala, color-ray nourishment is provided by the seven color-ray gemstones. Carnelian and Ruby stand in the southern hemisphere and Emerald, Blue Sapphire, Indigo, and Amethyst in the northern hemisphere. Yellow Sapphire rests on the east-west axis. Color rays are a form of life energy that directly contributes to how we feel and how well we interact with the world around us. Heaven and Earth energies are another type of life energy.
Depletion of life energy is one of the top reasons health suffers. When the body is healthy, it receives a continual supply of life-giving energy from several sources. This mandala supports the central chakra channel through which the fundamental Heaven and Earth energies flow. It also supports direct color-ray nourishment via the color-ray-bearing gemstones.
Two half circles of these seven gemstones mirror each other in the mandala’s middle circle. The vertical separation between them allows an opening for all the color rays to feed into the upper and lower openings of the central channel. Color rays do not normally flow into the central channel. So this is like an intravenous feed, necessary for desperate situations. Once these color rays enter the central channel, they are distributed throughout the body via the chakras.
Outer Circle: Restores Boundaries of Self-Protection
A particularly significant influence in this mandala is the circle of White Flash Moonstone that surrounds the entire mandala. White Flash Moonstone vitalizes the layer of aura that immediately surrounds the body. This all-important supraphysical aura supports many physical functions while also providing a meaningful layer of protection.
When healthy, the supraphysical aura can deflect unwanted or hurtful energies, thoughts, and emotions thrown your way. Like a cushion that surrounds you, it can protect you by softening their impact.
North-South Axis: Restores Wise Decision-Making Capabilities
When interpreting gemstone mandalas, we pay particular attention to gemstones on the north-south axis and east-west axis.
The north-south axis of this mandala consists of two Aquamarine and two Blue Sapphire with Diamond in the middle to provide blueprint guidance. The gemstone numerology of the number two offers flexibility to support better choices.
Aquamarine brightens, making it easier to see what those choices are. Blue Sapphire uses the influence of the number two along with its affinity with the mind, to moderate the amount of Heaven and Earth energy coming into the body. This continually varying amount is guided by subconscious choices, directed by the intelligence center at the chakra system window.
East-West Axis: Provides a Definitive Base of Support to Restore Stability
In this mandala, the east-west axis consists of two Blue Flash Moonstone, four Pink Chalcedony, four Yellow Sapphire, and two Tanzanite for a total of twelve gemstones. There is also one 7-color-ray Diamond in the center. The number twelve in gemstone numerology relates to one’s entire being. That means that this aura spray will balance symptoms of burnout and trauma wherever they may be manifested throughout your life.
This is also a relatively significant number of gemstones for a mandala. Twelve gems along the east-west axis will provide the stability of a canoe with an outrigger on each side, making for a very sturdy keel. Diamond represents the living blueprint of optimal health that guides you toward that stability, as the gemstones support your way of getting there.
Pink Chalcedony Square: Restores Emotional Balance
When stressed enough, the body will draw upon reserves from several places, one of which is the emotional body. As the emotional body becomes depleted, it loses control of the emotional energies it produces. Reactions become more compulsive and excessive, feelings are harder to face and accept, and moods can swing without provocation.
The Pink Chalcedony in this gemandala calms and relaxes the emotions. It gives you an emotional pause so that you are less likely to overreact and succumb to controlling thoughts, and instead respond to situations more calmly and intelligently.
The fact that these gems are positioned in the shape of a square directs their influence into the physical body, where they can be most impactful.
Yellow Sapphire: Restores Self-Identity
Two factors in this mandala support the restoration of self-identity. The most obvious factor is the three concentric circles that surround the 7-color-ray Diamond. The circles serve to lend focus to the central Diamond, which awakens, clears, and restores your connection with your living blueprint. This is the information of your highest self that leads you forward in health and purpose.
Second, Yellow Sapphire represents a person’s core, self-identity, and highest self. When that sense of uniqueness and sovereignty gets blurry, it becomes hard to define your thoughts and emotions. When these are unclear, poor decisions can be made. It’s harder to control actions that may later be regrettable. With four Yellow Sapphire at the east-west axis to nourish your core self, and with plenty of support from the rest of the gemstones in the mandala, you can reestablish your self-identity.
Yellow Calcite and Carnelian: Restores Healthy Relationships
Yellow Calcite is the vitalizing gemstone for the storage system. In this mandala, these gemstones are located within the circle of the seven color-ray gemstones to lend color-ray nourishment to that system. Yellow Calcite energy softens the boundaries of the storage system to allow this nourishment to come in. With seven-color-ray support, that which is not needed is recognized as such and becomes easier to let go.
Four Yellow Calcite border the two orange Carnelian. Energetically, Yellow Calcite helps the body decide what to store and Carnelian lends vitality, especially to relationships throughout your body and being.
In this mandala, the intention is to focus on relationships in a person’s life. What unhealthy relationships have been mistakenly held on to with such a deep sense of need that they’ve been stored as though essential to life itself? Doing so leads to giving trust and authority to those who have not earned it.
This mandala can help you unravel the illusion of that authority, give you the strength and support to recognize the difference between healthy and unhealthy relationships, and help you find freedom from the latter.
When restoring your self-identity, it’s important to separate yourself from your relationships—even the good ones–and not lose yourself in them.
Blue Sapphire: Get the Mind on Board
The Restore Yourself mandala has eight Blue Sapphire overall. It is significant to have eight of a single gemstone and it means that its purpose is particularly important. In this case, because it’s usually our minds that make us keep going. Without adequate rest, a condition of low energy can deteriorate to depletion which can deteriorate to burn out.
Blue Sapphire energy is nourishing and vitalizing for the mental body. By giving the mind this extra support, its more likely to make the choices you need to heal.
Geometry
Gemstone Numerology
The Restore Yourself gemstone mandala is based on the number four. In gemstone numerology, the number four provides stability and points the focus of the mandala on physical wellness. Many instances of the number four appear:
- Gemstones are present at the four cardinal points.
- Four Pink Chalcedony form a square.
- Four Pink Chalcedony lie along the east-west axis.
- Four Yellow Sapphire rest along the east-west axis.
- Four Yellow Calcite work side by side with Carnelian.
- Four Blue Sapphire surround the Blue Flash Moonstone.
The mandala hosts a total of eight Pink Chalcedony. In gemstone numerology, the number eight supports your personal evolution. Healing yourself and climbing out of the hole that burnout often produces provide the perfect opportunity to redefine who you are and emerge as a better version of yourself.
Gemstone Geometry
Obvious geometries in this mandala are the circle, half circle, and square. Minor geometries must be relatively obvious to have significance. In this mandala, they include triangles, a double triangle, and a rectangle.
Circles
Circles gather and hold information. They are also protective.
Three circles surround the central 7-color-ray Diamond.
Half Circles
Half circles that mirror each other strengthen one another by reflecting back and forth upon each other.
This mandala carries two half circles, those of Tanzanite and the color-ray gemstones.
Squares
Squares lend stability so that the effects of the mandala can be handled with grace.
One square is comprised of the Aquamarine and Blue Flash Moonstone at the cardinal points. Another is formed by the four Pink Chalcedony in the mandala’s free space.
Triangles
Triangles of gemstones support the changes required to improve wellness.
The Pink Chalcedony in the southern hemisphere of the mandala forms a triangle with the two Yellow Calcite in the color-ray-nourishing circle.
Double Triangle
Double triangles stabilize change while also allowing it to affect a greater expanse of your being.
Four Pink Chalcedony on each side of the mandala form a diamond or kite shape, bent by the roundness of the circle.
Central Rectangle
This geometry unites the gems’ purpose, allowing their energies to work together for those who use this mandala.
In this mandala, look for the two Amethyst and two Ruby that form a rectangle. Individually, these gemstones nourish the crown and root chakras, respectively.
To restore life energy, the crown and root chakras must be functioning well and any damage in these chakras must be corrected. Then, the other chakras will come into balance more naturally, especially with the help of the other gemstones in this mandala.

Reviews
There are no reviews yet.